Implants
In December 1996, some friends described a guy that had a metal plate
implanted inside his head, complete with spikes, to give him
a "metal mohawk". It was a pretty fuzzy story, which had probably been
distorted after being retold by many people. I thought this was
completely outrageous, but was very curious about it. The following spring,
I ran across an extremely good article on a man named Steve
Haworth at BME. Steve was the
man that did the procedure I had heard about in December. As it turns out,
Steve does many different procedures, including the metal mohawk, altho
the story told to me was quite distorted. However, you can read more
about the metal mohawk he did by reading an
interview on BME's
site.
Steve's primary modifications at the time were implants. Implants are
exactly what they sound like. A piece of jewelry is inserted under, or
inside, your skin. The implant can't really move around inside your body,
since the skin heals around it and holds it in place rather firmly. You can,
however, move them around just as much as you can move your skin, similar to
how you can distort a tattoo by stretching, folding, and moving your skin.
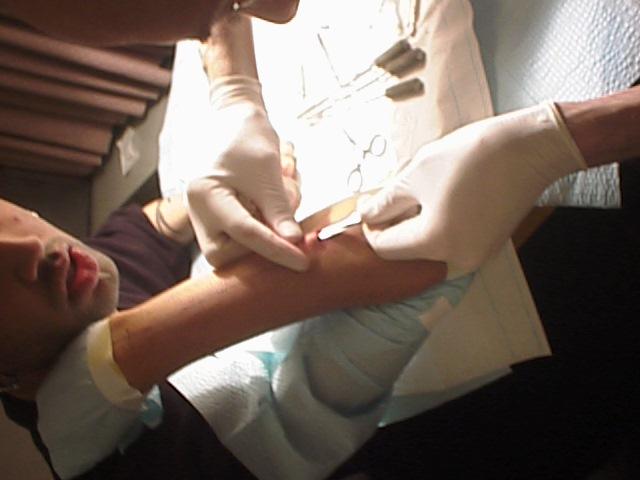
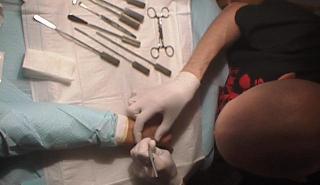 The procedure commences with a thorough cleaning of all equipment and
jewelry through an autoclave. Tons of candy is available, as well
as music. Candy acts as an energy booster, and of course, music helps
relax the patient. I made myself comfortable, and we began discussing what
was about to happen. Steve asked me to make my blood vessels more visible
by flexing for a while. He then marked all visible blood vessels with a
pen, to ensure extra caution and care during the skin separation process
in those areas.
Medical dressing was then put over the areas surrounding the area that will
receive the implant. One of those blue non-stick napkins, similar to those
used in hospitals, is taped to my skin. For smaller implants, such as the ring
in my outer forearm, the entire area is dressed, and a hole is cut into the
napkin to expose the area that will eventually be cut and have the
implant(s) inserted.
The procedure commences with a thorough cleaning of all equipment and
jewelry through an autoclave. Tons of candy is available, as well
as music. Candy acts as an energy booster, and of course, music helps
relax the patient. I made myself comfortable, and we began discussing what
was about to happen. Steve asked me to make my blood vessels more visible
by flexing for a while. He then marked all visible blood vessels with a
pen, to ensure extra caution and care during the skin separation process
in those areas.
Medical dressing was then put over the areas surrounding the area that will
receive the implant. One of those blue non-stick napkins, similar to those
used in hospitals, is taped to my skin. For smaller implants, such as the ring
in my outer forearm, the entire area is dressed, and a hole is cut into the
napkin to expose the area that will eventually be cut and have the
implant(s) inserted.
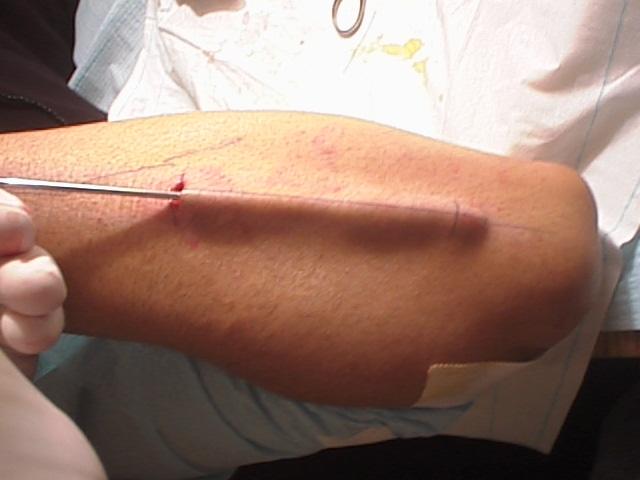
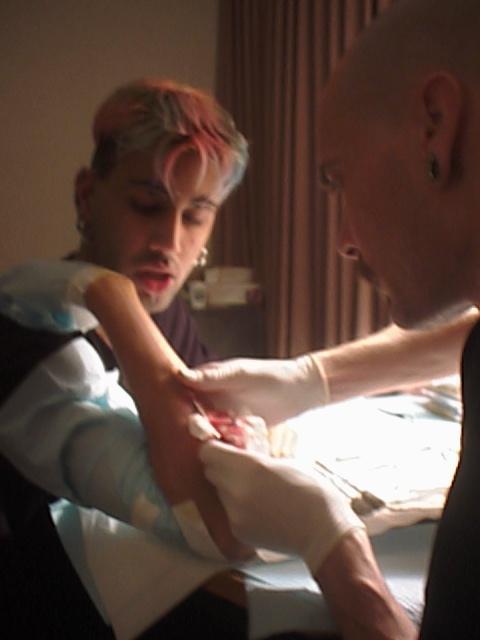
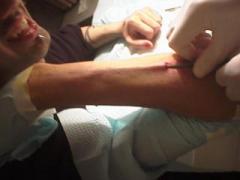
 Steve can't legally administer anesthetics because they require a license.
He can, however, have a registered nurse present to administer a local
anesthetic, or apply topical cream himself, which doesn't help
much. The first incision was cut fairly deep. It was made down to the layer
in my skin that would soon house the jewelry. The incision bled quite
a lot, and while it isn't the most pleasant thing. The way that the skin
was cut is kinda neat. It's similar to cutting through a cross between
leather and rubber. Steve makes as small of an incision as possible.
For example, for my rings, the incision is only big enough to fit the
bead through, since he can then curve the jewelry into a tiny hole to
get it inside. Once healed and partially faded, the scar becomes almost
invisible. Most people wonder how the implant made its way in, as there
are no visible entry point or incision scars.
Steve can't legally administer anesthetics because they require a license.
He can, however, have a registered nurse present to administer a local
anesthetic, or apply topical cream himself, which doesn't help
much. The first incision was cut fairly deep. It was made down to the layer
in my skin that would soon house the jewelry. The incision bled quite
a lot, and while it isn't the most pleasant thing. The way that the skin
was cut is kinda neat. It's similar to cutting through a cross between
leather and rubber. Steve makes as small of an incision as possible.
For example, for my rings, the incision is only big enough to fit the
bead through, since he can then curve the jewelry into a tiny hole to
get it inside. Once healed and partially faded, the scar becomes almost
invisible. Most people wonder how the implant made its way in, as there
are no visible entry point or incision scars.
 The area was constantly dabbed with gauze to soak up the blood. The goal was
that once the incision is complete, it will be used as an entry point to
create a pocket under the skin. The incision was made only as large as
necessary for the jewelry to sit comfortably. Different tools were used to
tear the various skin layers apart to form this pocket. Most of Steve's tools
for this purpose were very dull -- if too sharp, it would be easy for
them to cut more skin than intended. The natural layering of the skin
results in even, predictable tearing.
The area was constantly dabbed with gauze to soak up the blood. The goal was
that once the incision is complete, it will be used as an entry point to
create a pocket under the skin. The incision was made only as large as
necessary for the jewelry to sit comfortably. Different tools were used to
tear the various skin layers apart to form this pocket. Most of Steve's tools
for this purpose were very dull -- if too sharp, it would be easy for
them to cut more skin than intended. The natural layering of the skin
results in even, predictable tearing.
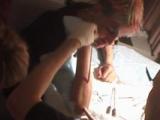
The tearing was the longest part of the procedure. Steve first went in with
a thin tool, just to create channels. Slowly, the width of the tools he
uses increased, which caused the channels to expand until they merge together.
Eventually, a tool resembling a golf club was inserted, to insure that all
incisions resulted in proper tissue separation. Troublesome tissue
was separated with a special V-shaped tool. The tool had dull sides, and
a sharp edge on the inside, Some tissue is rather tightly stuck together,
but sometimes, as was the case with the bottom half of my right arm
spine, the elevators just spread the layers like a knife cutting through
butter.
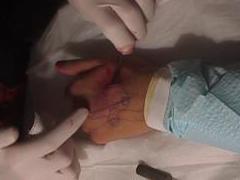
| 
|
| Starting the separating
| Using the golf club tool
|
| 
|
| Using a larger golf club tool
| Jewelry inserted
|
 The next part of the procedure was the coolest part of the entire process.
Watching and feeling something moving around under your skin is a pretty neat
experience. It feels very surreal, almost like its not happening to
something that is attached to you. The amount of endorphins in your body
while this is happening gives you an absolutely incredible high. However,
it can get somewhat gruesome when the bubbles of blood and flesh pop out
of the entry hole and make little splatters. When I had my first piece
implanted, my girlfriend and another friend watched. She watched both
this procedure and the next in its entirety, but my friend didn't enjoy
it too much, and had to leave the room.
The next part of the procedure was the coolest part of the entire process.
Watching and feeling something moving around under your skin is a pretty neat
experience. It feels very surreal, almost like its not happening to
something that is attached to you. The amount of endorphins in your body
while this is happening gives you an absolutely incredible high. However,
it can get somewhat gruesome when the bubbles of blood and flesh pop out
of the entry hole and make little splatters. When I had my first piece
implanted, my girlfriend and another friend watched. She watched both
this procedure and the next in its entirety, but my friend didn't enjoy
it too much, and had to leave the room.
The implants are made of 316L stainless steel. This is the same stainless
steel used in surgical ligating clips, surgical staples and stainless
steel wire. It is an alloy that contains, aside from the iron, 18%
chromium, 3% molybdenum and 14% nickel. The large amount of nickel
stabilizes the iron component, rendering the alloy non-magnetic.
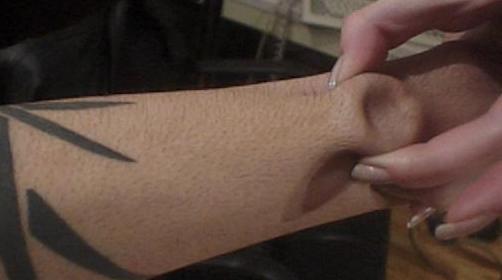
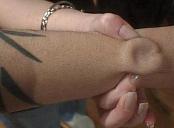
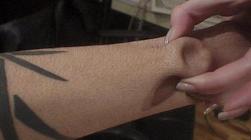 My first implant procedure was performed in the summer of 1997. It involved
placing a ring inside my outer forearm. The ring isn't completely closed;
there is a small gap on it, and one of the ends has a ball fused on to it.
The gap is pretty small; it was only wide enough to sufficiently slide into
my arm. This is my least visible implant, because it ended up sinking into
my arm a bit. If I had more defined muscles in that area of my forearm,
it would become more visible. A good benefit of this is that it can be
pulled farther with my skin, and it's much more possible for me to play with
it than any of my other implants.
My first implant procedure was performed in the summer of 1997. It involved
placing a ring inside my outer forearm. The ring isn't completely closed;
there is a small gap on it, and one of the ends has a ball fused on to it.
The gap is pretty small; it was only wide enough to sufficiently slide into
my arm. This is my least visible implant, because it ended up sinking into
my arm a bit. If I had more defined muscles in that area of my forearm,
it would become more visible. A good benefit of this is that it can be
pulled farther with my skin, and it's much more possible for me to play with
it than any of my other implants.
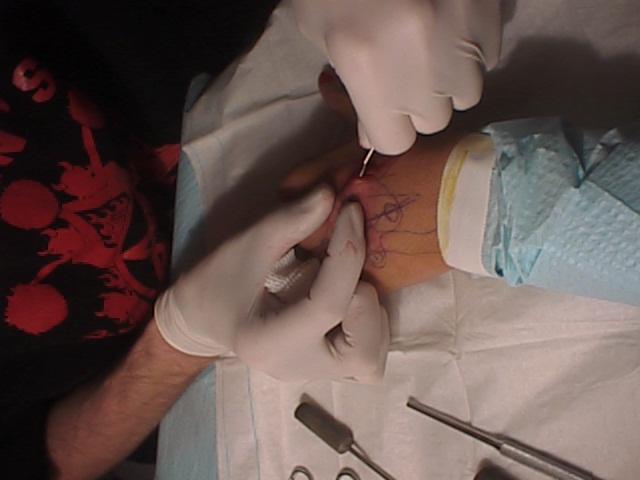
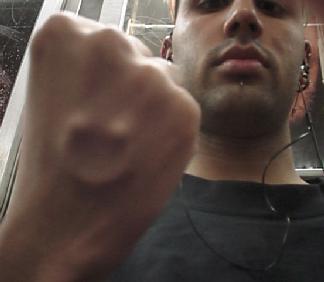
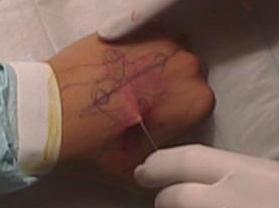
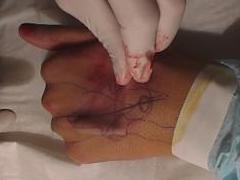
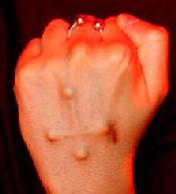
 The second implant I received was done minutes after the first one. I
had a circular barbell inserted into the back of my right hand. It's
not very big, but since I have very muscular hands, it shows through
very well. This jewelry was placed a bit off center on my hand because
when I stretch my hands, the tendons that connect to my index finger
would collide with the implant, and become irritated. Rather than taking
the chance of letting this happen, we just placed it a bit away from my
tendon. The incision to do this was just as small as for the ring in
my forearm, since all that needed to go inside was one end of the barbell.
Due to how the skin of the hands recycles itself faster than almost
anywhere else in the body, the scar for this cut was the fastest to fade
of any of any of my implants.
The second implant I received was done minutes after the first one. I
had a circular barbell inserted into the back of my right hand. It's
not very big, but since I have very muscular hands, it shows through
very well. This jewelry was placed a bit off center on my hand because
when I stretch my hands, the tendons that connect to my index finger
would collide with the implant, and become irritated. Rather than taking
the chance of letting this happen, we just placed it a bit away from my
tendon. The incision to do this was just as small as for the ring in
my forearm, since all that needed to go inside was one end of the barbell.
Due to how the skin of the hands recycles itself faster than almost
anywhere else in the body, the scar for this cut was the fastest to fade
of any of any of my implants.
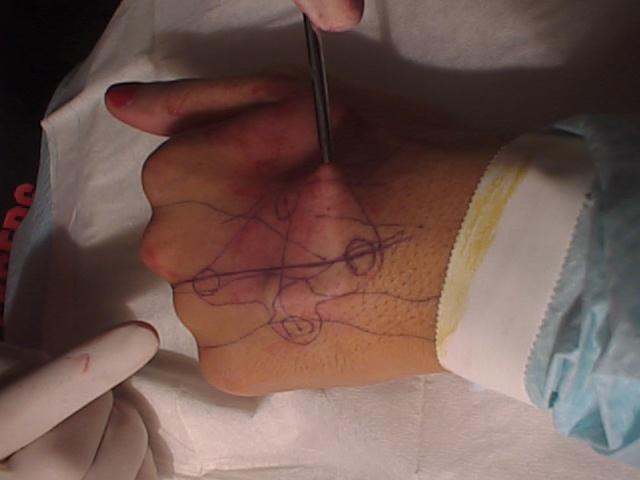
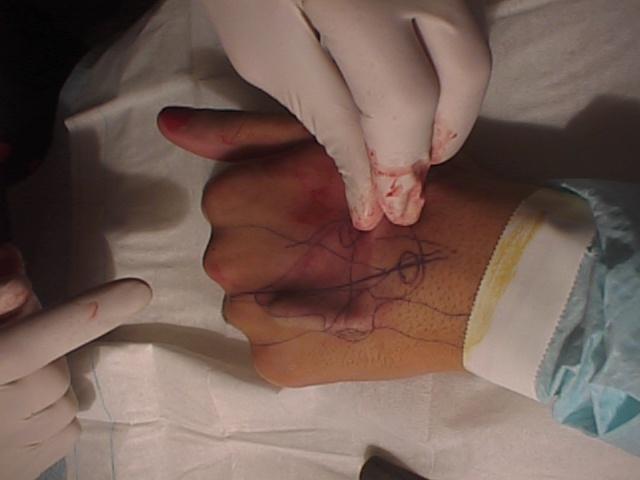
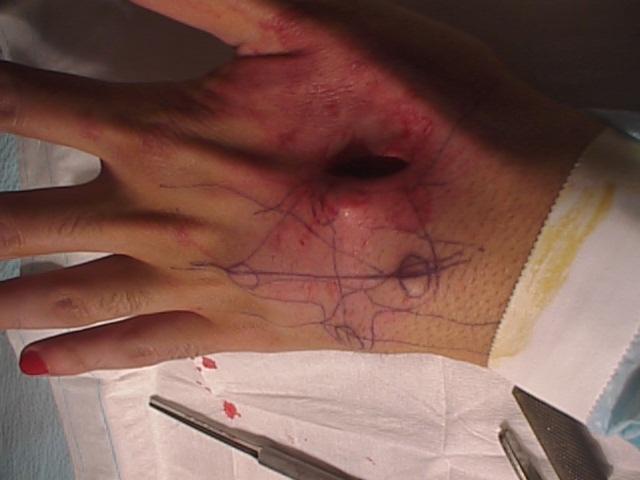
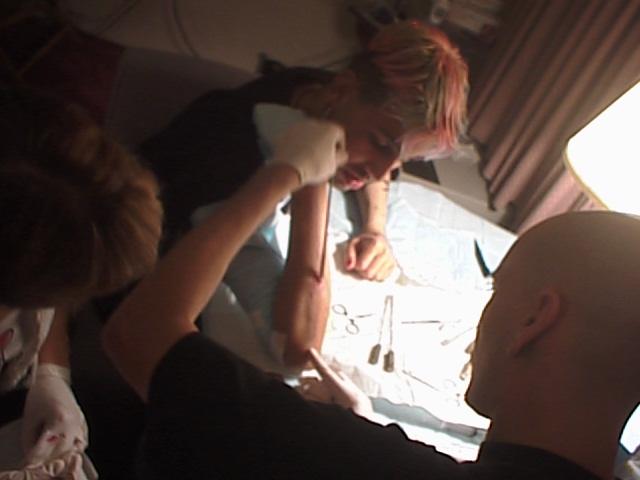
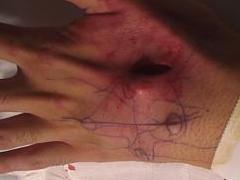
 My next implant was done in Richmond, VA, at a tattoo convention in
the fall of 1997. Since Steve travels a lot, he can take his equipment
(an autoclave, tools, and jewelry) with him fairly easily, permitting to do
procedures just about anywhere. I decided that I wanted a cross
implanted in the back of my other hand. The cross has no meaning; it
was just available and looked neat. Steve was very skeptical about putting
it in my hand, but after bending it to fit the curve of my hand, he agreed
to do it. The cross is all one piece. Because of this, the incision which
the implant would be pushed through had to be as wide as one half of the
width of the jewelry. This was to be the largest implant incision I've
ever had. Seven stitches were used to close up the opening. These stitches
were the reason I later became very interested in sutures.
My next implant was done in Richmond, VA, at a tattoo convention in
the fall of 1997. Since Steve travels a lot, he can take his equipment
(an autoclave, tools, and jewelry) with him fairly easily, permitting to do
procedures just about anywhere. I decided that I wanted a cross
implanted in the back of my other hand. The cross has no meaning; it
was just available and looked neat. Steve was very skeptical about putting
it in my hand, but after bending it to fit the curve of my hand, he agreed
to do it. The cross is all one piece. Because of this, the incision which
the implant would be pushed through had to be as wide as one half of the
width of the jewelry. This was to be the largest implant incision I've
ever had. Seven stitches were used to close up the opening. These stitches
were the reason I later became very interested in sutures.
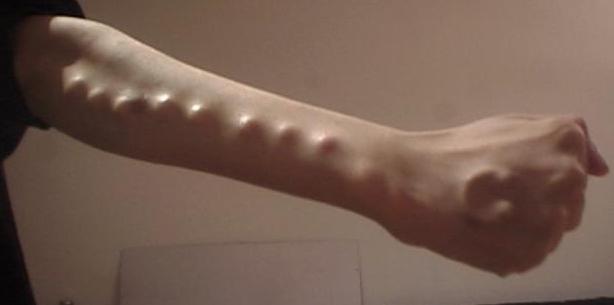
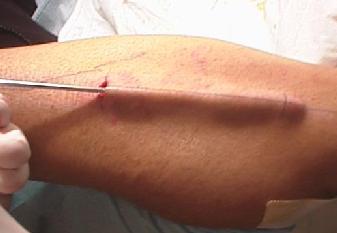
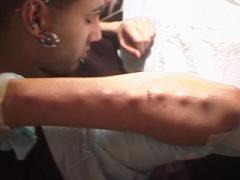
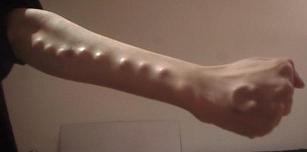
That same day, I had 8 Teflon hemispheres put into my right outer forearm,
in a straight line from my elbow to my wrist. The incision was made
halfway between the elbow and the wrist, and elevators were used to
separate the skin all the way from the incision to the elbow, and up to
my wrist. The incision was made like this so the elevator could reach all the
way down to the ends of the arm, and still only use one incision. Going from
the incision to the elbow was just like a knife going through warm butter.
Separating from the incision to the wrist was a bit more problematic, but not
too much of a deal. I think this is my best looking implant. It looks just
like another spine, only it's on my arm.
| 
| 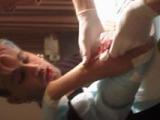
|
| Half done
| Having trouble going in
| Cleaning up blood
|
| 
|
| All the way in
| Finally done
|
The healing process was actually quite simple compared to that of a
complex piercing, although it required much more delicacy. The implanted
area became very sore for about one to two weeks. It felt just as though
someone cracked me on the arm or the hand with a baseball bat. For my
hand implants, I couldn't move my fingers very well, even enough to type,
for three to four days. I wore an ACE bandage around my arm and hands
to insure constant pressure.
 For the rings, I placed a piece of cotton between the bandage and the implant,
so that the skin in between would press down and heal down, instead of
develop scar tissue in the middle. For the Teflon hemispheres in my
right arm, I had to wear strips of tape between them. The tape was wrapped
rather tightly around my arm, so they wouldn't shift up and down and clump
together. Nothing really kept them from moving side to side, but since
the channel wasn't made in that direction, it really wasn't that big of
an issue. They ended up shifting a bit after they healed, but not a lot.
Guiding them is about all you can do, but they will settle where they want
to.
For the rings, I placed a piece of cotton between the bandage and the implant,
so that the skin in between would press down and heal down, instead of
develop scar tissue in the middle. For the Teflon hemispheres in my
right arm, I had to wear strips of tape between them. The tape was wrapped
rather tightly around my arm, so they wouldn't shift up and down and clump
together. Nothing really kept them from moving side to side, but since
the channel wasn't made in that direction, it really wasn't that big of
an issue. They ended up shifting a bit after they healed, but not a lot.
Guiding them is about all you can do, but they will settle where they want
to.
 The swelling went down after a few days, and the skin started to become
more firm again. I assume that the various layers were rejoining
to each other. After about two weeks, the stitches were removed, and all
that was left was for the cut to heal itself.
The swelling went down after a few days, and the skin started to become
more firm again. I assume that the various layers were rejoining
to each other. After about two weeks, the stitches were removed, and all
that was left was for the cut to heal itself.
I used to be able to flip my hemispheres in my arm upside down, but the
skin is really really tight around them now, so I really can't anymore.
I tried a while ago, and I got it to go upside down, but it took me a
really long time to get it back over. It was most unpleasant forcing it
back over.
As far as I know, Steve is the only person that can do implants similar
to these. Unlike beading, where tiny beads are inserted under the skin,
generally by a deep puncturing and leaving the bead in a hole, these
require special tools which Steve created himself, to create the pockets
in the subcutaneous layer of the skin. Beading is mostly always done
in the penis, where as Steve's methods are done everywhere on the body.
He even has alternative to beads in the penis that include slightly
curved bars. The incisions that are made to create the pocket under the
skin also requires stitching.
Steve won't just perform the procedures on anybody. He insists that his
clients must have committed themselves to a lifestyle of body modification,
and they have to have a completely clear understanding of post-procedural
care. Someone with a naval or tongue piercing aren't included in these
requirements, since they have become extremely trendy.
Back.
| All images
and pages copyright © 2004 Danny Dulai unless otherwise noted. All
rights reserved. Copyright violations will be prosecuted and damages
sought under USC Title 17. |